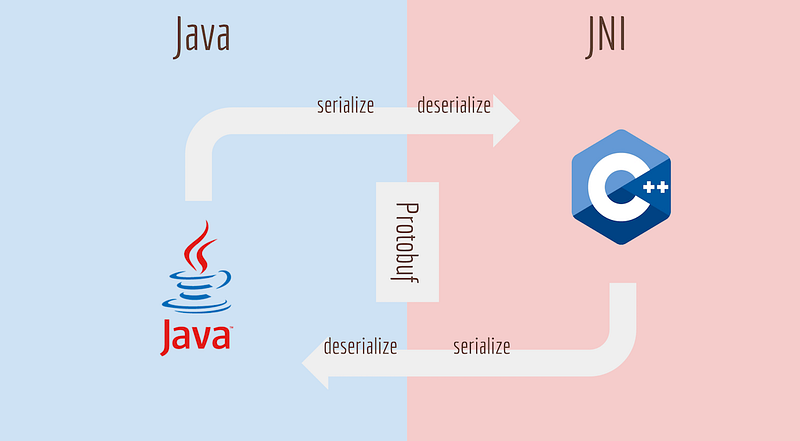
If you have ever been integrating c/c++ library to your Android project, you probably will know how painful it is to pass complicated data structure through JNI (Java Native Interface). If your data structure is big enough, error like reference table overflow would become a nightmare.
JNI ERROR (app bug): local reference table overflow (max=512)So how could I improve it? I think the Java and JNI layers in an Android app are actually two systems. What would engineers usually do to pass data in between two servers on the internet? Generally is JSON.
Apparently, I need to serialize the data to a sequence of binary and send it to another system, then the receiver deserialize it. That’s why I need the Google Protobuf.
There’re many serialization/deserialization libraries, like JSON or MsgPack. But that’s beyond this talk, I’ll be focusing on the Protobuf here. Google Tensorflow uses Protobuf as the storing format of a graph map file. I use Protobuf as the internal data for communicating JAVA with native components. For example: dlib and openCV.
This article is essential about how to cross-compile libprotobuf-lite.so for ABI of armeabi, armeabi-v7a and arm64-v8a.
**My environment:
**CMake:3.6.0-rc2
NDK:14.1
Protobuf:v3.2.0Mac:10.12.4Homebrew:1.1.13
Setup
Step 1.
In order to use NDK, I install it through the package manager of Android Studio.
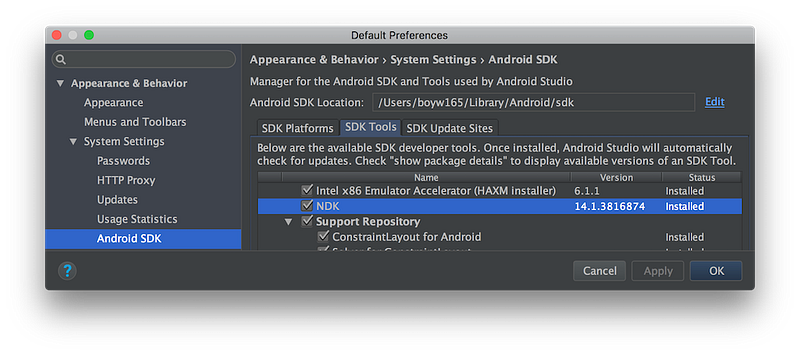
So the installed SDK will be at,
/Users/<your_user_name>/Library/Android/sdkAnd the NDK is at,
/Users/<your_user_name>/Library/Android/sdk/ndk-bundle**Step 2.
**I also setup the environment variables for SDK, NDK or simply letting myself type in less keys.
Add the following code to my ~/.zshrc:
# Env variable for Android SDK.
export ANDROID="$HOME/Library/Android/sdk"
export ANDROID_HOME="$HOME/Library/Android/sdk"
# Env variable for Android NDK.
export ANDROID_NDK="$HOME/Library/Android/sdk/ndk-bundle"
export ANDROID_NDK_HOME="$HOME/Library/Android/sdk/ndk-bundle"
# Env variable for Android cmake.
export ANDROID_CMAKE="$ANDROID_HOME/cmake/3.6.3155560/bin/cmake"
Step 3.
Cross compiling is always annoying. In addition to setup CC and CXX, I need to assign CMAKE_SYSTEM_PROCESSOR, CMAKE_FIND_ROOT_PATH environment variables and more. Luckily, Google NDK provides a CMake configuration file, android.toolchain.cmake, which could save my time of configuring the environment for cross compiling. I think the configuration file could be used almost everywhere.
To get the android.toolchain.cmake file:
1. You could either download it from patched version for r14 or latest version. (If you’re not familiar with CMake, use the patched version)
2. Or install CMake through the package manager of Android Studio.
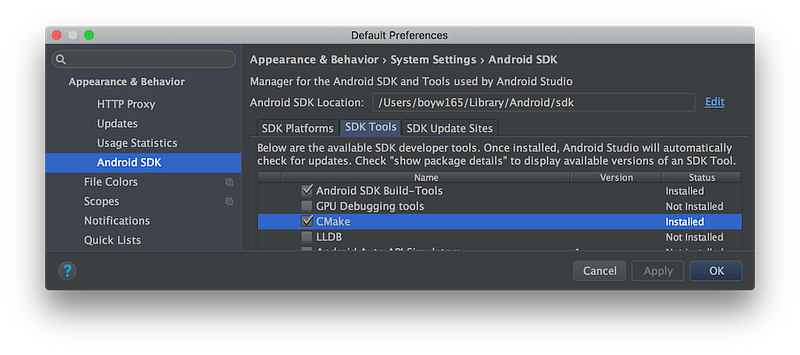
And the android.toolchain.cmake would be in the folder,
/Users/<your_user_name>/Library/Android/sdk/cmake/<cmake_ver>/Build “libprotobuf-lite.so”
**Step 1.
**If you get the latest stable source packages from the releases page, you could skip this step. If you check out the code via git clone, this gmock directory won’t exist and you will have to download it manually or skip building Protobuf unit-tests.
Download the gmock as follows:
cd <path-to>/protobufgit clone -b release-1.7.0 https://github.com/google/googlemock.git gmockThen go to gmock folder and download gtest:
cd gmockgit clone -b release-1.7.0 https://github.com/google/googletest.git gtestStep 2.
Because I want to build libprotobuf-lite.so only and there’s no such option to build the lite version in the cmake/CMakeLists.txt, I need to patch the cmake/CMakeLists.txt and cmake/install.cmake files as follows:
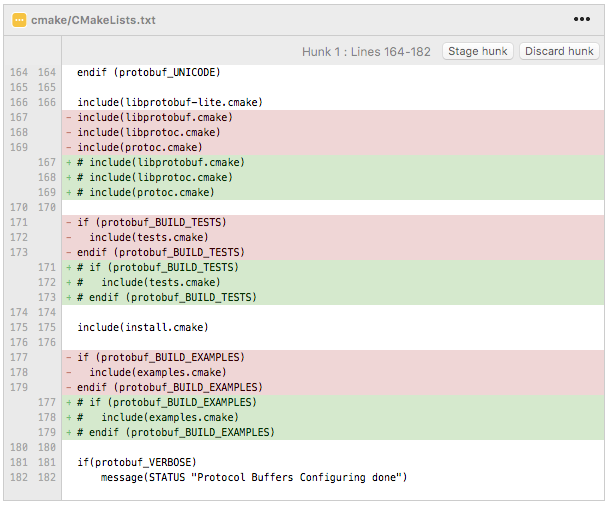
Patch for cmake/CMakeLists.txt
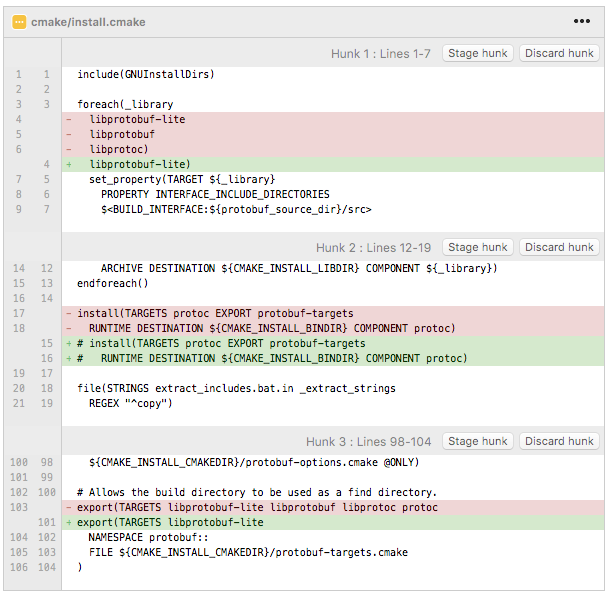
Patch for cmake/install.cmake
I patch the *.cmake is also because it ends up trying to run js_embed which is a generated executable binary file of ABI armeabi-v7a. Of course it cannot run on my Mac and it fires the error.
Step 3.
There’re four main steps as follows:
1. I’m using protobuf of version v3.2.0. So I switch to the right git commit v3.2.0, which is 593e917c.
2. The CMake files is in the cmake folder. In order not to mess up the generated code and source code together. I ran the build process in the cmake/build-armeabi-v7a folder.
3. Run cmake along with android.toolchain.cmake configuration.
4. Build the shared library with the generated Makefile.
5. (Optional) Install the generated binary files and exported header files to specific folder.
# Step 1. Check out the release branch or commit.
git checkout v3.2.0

# Step 2. Create build-armeabi-v7a folder for storing generated files.
cd cmake && mkdir build-armeabi-v7a && cd build-armeabi-v7a

# Step 3. Generate Makefile with CMake.
# -Dprotobuf_BUILD_SHARED_LIBS=ON           By default is static library (*.a file). I want a
#                                           shared library (*.so file).
# -DCMAKE_INSTALL_PREFIX                    Because it's a cross-compiled library. You probably
#                                           want to install the header files and shared library
#                                           in specific folder rather than default /usr/local
#                                           directory.
# -DANDROID_STL=c++_shared                  For the library using C++11, link to C++11 runtime.
# -DANDROID_LINKER_FLAGS="-landroid -llog"  For the library using functions of libandroid.so
#                                           and liblog.so.
# -DANDROID_CPP_FEATURES="rtti exceptions"  Most ppl use exception and runtime-type-information
#                                           features in their C++ projects.
#
# Debug Tips:
# Add -LAH to see variables.
$ANDROID_CMAKE \
    -Dprotobuf_BUILD_SHARED_LIBS=ON \
    -DCMAKE_BUILD_TYPE=Release \
    -DCMAKE_TOOLCHAIN_FILE=/<your_path>/android.toolchain.cmake \
    -DCMAKE_INSTALL_PREFIX=/<your_install_path>/protobuf \
    -DANDROID_NDK=/Users/<your_user_name>/Library/Android/sdk/ndk-bundle \
    -DANDROID_TOOLCHAIN=clang \
    -DANDROID_ABI=armeabi-v7a \
    -DANDROID_NATIVE_API_LEVEL=16 \
    -DANDROID_STL=c++_shared \
    -DANDROID_LINKER_FLAGS="-landroid -llog" \
    -DANDROID_CPP_FEATURES="rtti exceptions" \
    ..

# Step 4. Run Make with generated Makefile.
$ANDROID_CMAKE --build .

# Step 5 (optional). Install the generated header files and shared library
# to specific folder.
make install
There’re two important things you could keep in mind:
1. The protobuf uses __android_log_write feature, so I add -landroid -llog to the linker flags.
2. The linked STL setting must be the same with the one of JNI. Otherwise you would get a bunch of errors like, “referenced symbol not found”, when compiling the JNI code.
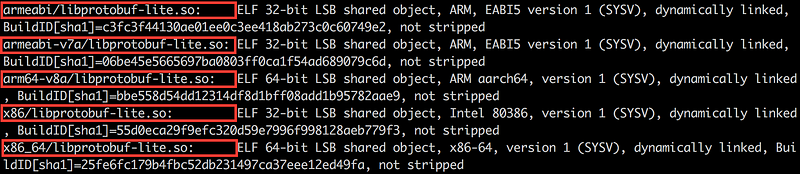
The size of libprotobuf-lite.so is about 2.5 MB. Eventually, I also build the ABI of armeabi, arm64-v8a, x86 and x86_64 ones just by changing the -DANDROID_ABI flag.
(Optional) Build protobuf-3.2.0.jar
Step 1.
I would also build a protobuf-3.2.0.jar for Java layer and I need to install Maven.
brew install mavenStep 2.
I will need to place the protoc executable in src/. If you built it yourself, it should already be there. If not, you could copy the prebuilt version from homebrew as follows.
brew install protobuf && copy `which protoc` srcStep 3.
Enter the command in the terminal as follows:
cd java && mvn packageThe *.jar will be placed in the java/core/target directory.
In 3.2.0, the Java lite version seems unstable so they disable it (could find it in java/pom.xml file).

End
Thanks for reading. 😀