I’m working on the PicCollage android app, which is a digital collage editor on the smart phones. This app has been distributed to the Android, iOS and Windows platforms. Among these three distributions, the app has many common features and one out of them is the grid layout generator.
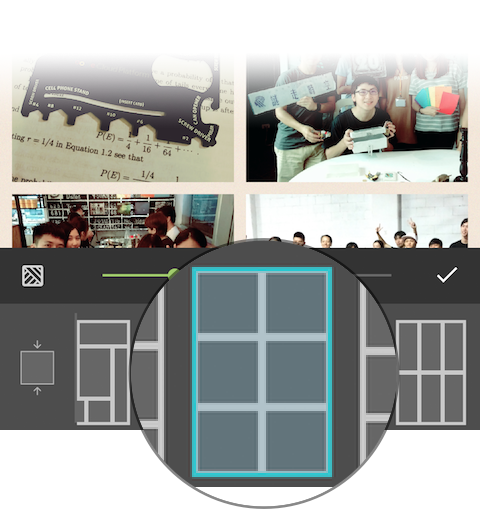
So I’m going to introduce how do we make this part a library and rewrite it from Java to JNI/C++ so that it is supported cross platforms.
Story
At the very beginning, we developped the grid generating algorithms separately on different platforms and it was all good. As we were introducing more algorithms for generating the grid layouts, we sometimes fixed the bugs but forgot to deliver the message to the other teams or members, so we started generating very different grid layouts on the different platforms. Apparently, generating the grid layouts is irrelevant to the view componenets and this common part is just like the business logic. So we started thinking, how could we “code once, and use it everywhere?”. We decided to rewrite this part as a library which could be used cross platforms.
We quickly tried couple solutions like:
- Haxe
- Xamarin
- C/C++
And we eventually choosed C++ because it’s inspired from C, we don’t want to manage memory allocation all the time, and also it is commonly used in the industry for years. Compared to the other alternatives, the C++ runtime size is small enough and stable than those frameworks.
The Infrastructure
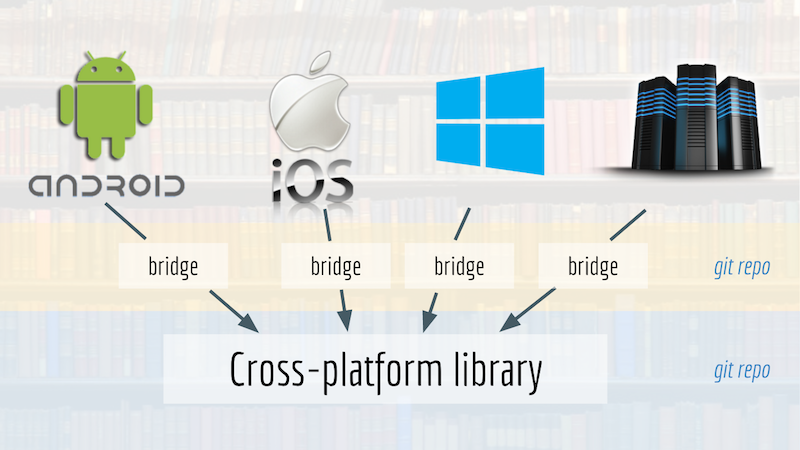
We want the library a pure business logic, saying it knows nothing about the platforms. There’re only generic methods that you should follow the protocol and simply use them. So the library is pushed to an indepent git repository. And we also created the bridge projects responsible for communicating the platform codes with the library. The dependency chain is like from top to bottom, the platform knows the bridge and the bridge knows the library.
Good
- In general, a robust app project is much bigger than a module project. In the bridge project, we could build a small app inside for integration tests or visual tests.
- Deploy the bridge project to a bundle that could be easily integrated into your robust app project. It saves the build time for you and your app is way more flexible. e.g. AAR for the Android app and POD for the iOS app.
- The dependency of chosing the build system for the bridge project is decoupled from your robust app.
Drawback
- I don’t know, you tell me. :D
The Bridge Project
As an Android app developer, I reference to the gradle-experimental document and android-ndk github repository to build our Android bridge project.
Compared to the stable/old-fashioned way of providing the Android.mk and Application.mk files:
Good
- You don’t need to manage your NDK path anymore.
- The latest AndroidStudio is able to index the C/C++ symbols since it understand the
build.gradlefile.
Drawbacks
- The document of the experimental gradle is very messy and insufficient.
- The examples on the github are changing all the time.
- The latest gradle is sometimes unstable.
We eventually took the risk of using the experimental gradle simply because I don’t want a new guy has to download the NDK and put the NDK under a specific path manually before building the project. Just let the gradle build system handle all the rest for us.
Let’s take a look at the bridge project on the Android end!
The snapshot of directory tree
.
├── whatever-lib
|   ├── build.gradle
│   ├── libs/..
│   └── src
│       ├── androidTest/..
│       ├── main
│       │   ├── java/..
│       │   ├── jni/
│       │   │   └── cpp/..
│       │   ├── jniLIbs/..
│       │   └── res/..
│       └── test/..
├── app
|   ├── build.gradle
│   ├── libs/..
│   └── src
│       ├── androidTest/..
│       ├── main/..
│       └── test/..
└── build.gradle
We designed the directory by just following the AndroidStudio convention. The bridge is an Android library, whatever-lib, where we put all the Java, C/C++ and JNI codes. Run ./gradlew whatever-lib:assembleRelease will deploy an AAR file. And we also have a lightweight app project for testing the library visually. We emphasize “visually” is because there’re unit-tests in the library but, we still need to see the visual outcome from the library.
- Java codes are all in the
whatever-lib/src/main/java/. - JNI codes are all in the
whatever-lib/src/main/jni/. - C/C++ belong to the library are all in the
whatever-lib/src/main/jni/cpp/. We use git-subrepo to bring the codes in. That’s an another story that we use the git-subrepo instead of the git-submodule and I won’t explain that here.
And the followings are the snapshots of the root build.gradle and the library build.gradle.
The root build.gradle
We use the gradle of stable version of 2.1.3 and experimental version of 0.7.3 at the same time. Amazing huh!? They don’t conflict with each other.
// Top-level build file where you can add configuration options common to all sub-projects/modules.

buildscript {
    repositories {
        jcenter()
    }
    dependencies {
        classpath 'com.android.tools.build:gradle:2.1.3'
        classpath "com.android.tools.build:gradle-experimental:0.7.3"

        classpath 'com.google.protobuf:protobuf-gradle-plugin:0.8.0'

        // NOTE: Do not place your application dependencies here; they belong
        // in the individual module build.gradle files
    }
}
The library build.gradle
apply plugin: 'com.android.model.library'

model {
    android {
        compileSdkVersion 23
        buildToolsVersion "23.0.3"

        defaultConfig.with {
            minSdkVersion.apiLevel = 15
            targetSdkVersion.apiLevel = 23
        }

        compileOptions.with {
            sourceCompatibility = JavaVersion.VERSION_1_7
            targetCompatibility = JavaVersion.VERSION_1_7
        }

        def CPP_SOURCES = "src/main/jni/cpp"

        ndk {
            platformVersion = 15
            // The name of the native library recognized by JNI.
            moduleName "whatever-lib"
            // The compiler options, including the the root path and common
            // header files path.
            cppFlags.addAll(["-frtti",
                             "-fexceptions",
                             "-DUSE_PROTOBUF=1",
                             "-DHAVE_PTHREAD=1",
                             "-I" + file("${CPP_SOURCES}").absolutePath,
                             "-I" + file("${CPP_SOURCES}/include").absolutePath,
                             "-I" + file("${CPP_SOURCES}/third_party").absolutePath])
            // Support JNI to print message through __android_log_print method.
            ldLibs.addAll(["log", "android"])
            // Determine what STL library being linked to.
            stl = "gnustl_static"
            // ABI
            abiFilters.addAll([
                    "armeabi",
                    "armeabi-v7a",
                    "x86",
                    "x86_64"
            ])
        }

        sources {
            main {
                jni {
                    source {
                        // Exclude CMake, Makefile and unit-tests files.
                        exclude "**/*CMake*"
                        exclude "**/Catch.hpp"
                        exclude "**/*Test*"
                        exclude "**/tests"
                    }
                }
                jniLibs {
                    source {
                        srcDirs "src/main/jniLibs"
                    }
                }
            }
        }

        buildTypes {
            release {
                debuggable false
                minifyEnabled false
                proguardFiles.add(file('proguard-rules.pro'))
            }
        }
    }
}

dependencies {
    compile fileTree(dir: 'libs', include: ['*.jar'])
    testCompile 'junit:junit:4.12'
}
Meet the JNI
JNI is short for Java Native Interface. You might check out the tutorial from Google or the JNI document. In a nutshell, JNI is a way for calling C/C++ functions from Java. And the JNI framework lets a native method use Java objects in the same way that Java code uses these objects. A native method can create Java objects and then inspect and use these objects to perform its tasks. A native method can also inspect and use objects created by Java application code.
Sounds good, huh?
Pass data from Java to Native
- Find class ID from the given Java instance.
- Find method/field ID from the class-ID so that you could call the member functions or get the member fields.
- Most important, you are asked to define the type-signature for accessing the class, method and field ID.
Example:
// Iterate through the elements in a java.util.List instance.
jclass listClazz = env->FindClass("java/util/List");
jmethodID listSizeMethodId = env->GetMethodID(listClazz, "size", "()I");
jmethodID listGetMethodId = env->GetMethodID(listClazz, "get", "(I)Ljava/lang/Object;");

// jobject jlist.
for (int i = 0; i < env->CallIntMethod(jlist, listSizeMethodId); ++i) {
  jobject element = env->CallObjectMethod(jlist, listGetMethodId, i);
}
Pass data from Native to Java
- Find class ID for instantiating a Java instance.
- Find the constructor method ID from the class-ID.
- Find method/field ID from the class-ID so that you could call the member functions or set the member fields.
Example:
// Return a com.a.b.c.WhateverClazz object from native to Java.
jclass whateverClazz = env->FindClass("com/a/b/c/WhateverClazz");
jmethodID whateverCtorMethodId = env->GetMethodID(whateverClazz, "<init>", "()V");
jobject ret = env->NewObject(whateverClazz, whateverCtorMethodId);

return ret;
Yes, JNI is powerful but also primitive. Following is the principle guide:
- To reference Java non-primitive object, you need to provide the JNI environment the class name, which is a Java class string with
/replaced by the..For example:java.util.Listbecomesjava/util/List. - To access the class member methods or fields, you need to provide a string, called type signature, to the JNI environment.
The rule of the type signature
- The arguments type is enclosed in the
(and)and is followed by the return type. - The non-primitive argument type start by the
Land end with the;. e.g.Ljava/util/List;.
For example:
- A method takes two floats and return an integer, the type signature is
(FF)J - A method takes two lists and return a boolean, the type signature is
(Ljava/util/List;Ljava/util/List;)Z.
Table: Type signature
| Type Signature | Java Type |
|---|---|
| Z | boolean |
| B | byte |
| C | char |
| S | short |
| I | int |
| J | long |
| F | float |
| D | double |
| V | void |
| L full-qualified-class ; | fully qualified class |
| [ type | type [] |
| ( arguments-type ) return-type | method type |
Drawbacks of JNI
But we are still unsatisfied with the JNI because:
- Passing complicated data back and forth through the JNI is annoying.
- ReferenceTable overflow (max=512) JNI.
JNI ERROR (app bug): local reference table overflow (max=512)I personally think the reference table overflow is a killing pitfall. In our case, the library generate grids for us. If the grids number is over 512, we simply cannot handle it. I think this is the main reason that we turned to search serialization/deserialization solution.
Good to see the protobuf library
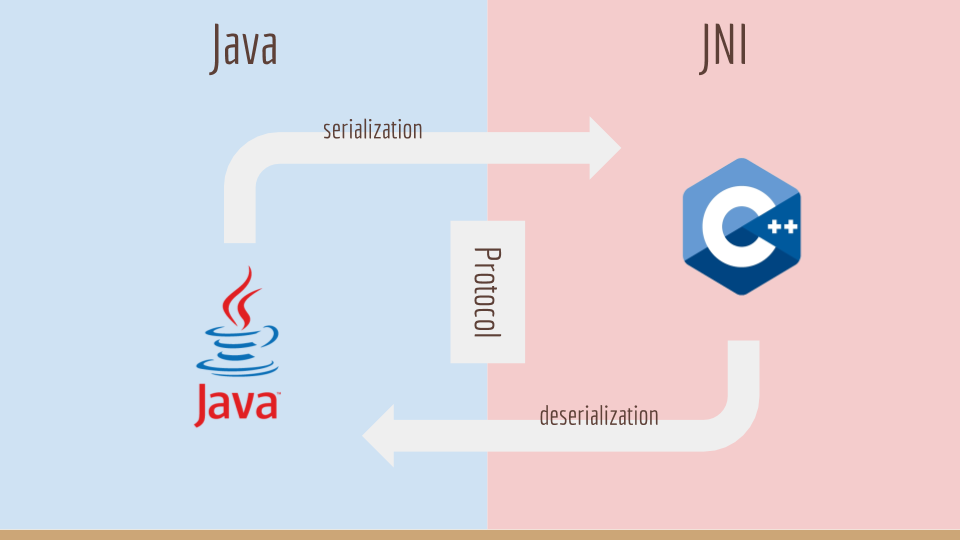
There are many popular serialization/deserialization libraries like:
- JSON [github]
- Google Protobuf [doc] [3.0.x github]
- MsgPack [doc]
JSON and Google Protobuf are both popular. We apply the serialization/deserialization library to help us to exchange the data in a uniform way. I strongly suggest you to study the document to learn its usage.
We use protobuf of version 3.0.1 for both the runtime and the compiler. Compared to version of 2.7.0, the 3.0.1 supports Android, iOS, Linux and Windows natively. The build process of 2.7.0 is way complicated to the 3.0.1. You basically can copy all the source codes under src[link] to your project and it could be compiled smoothly.
Sample of a proto file:
message Person {
  required string name = 1;
  required int32 id = 2;
  optional string email = 3;
}
Pass data from Java to native (deserialization):
JNIEXPORT jbyteArray JNICALL
Java_a_b_c_whateverNative(JNIEnv* env,
                          jobject thiz,
                          jbyteArray data) {
  // Get the byte[] pointer and data length.
  jbyte* pData = env->GetByteArrayElements(data, NULL);
  jsize pDataLen = env->GetArrayLength(data);

  // Deserialize from the byte stream.
  Person john;
  john.ParseFromArray(pData, pDataLen);
}
Return data from native to Java (serialization):
JNIEXPORT jbyteArray JNICALL
Java_a_b_c_whateverNative(JNIEnv* env,
                          jobject thiz,
                          jbyteArray byteData) {
  // Create a Person instance.
  Person john;
  john.set_name("john");
  john.set_id(123);
  john.set_email("john@gmail.com");

  // Serialize the Person instance to byte stream.
  int size = john.ByteSize();
  jbyte* temp = new jbyte[size];
  gridList.SerializeToArray(temp, size);

  // New return Java byte[].
  jbyteArray out = env->NewByteArray(size);
  env->SetByteArrayRegion(out, 0, size, temp);
  delete[] temp;

  return out;
}
Lightweight protobuf
From the marketing experience, the size of the Android app matters. People are more likely to download your app with smaller size.
You need two steps to minize the library size:
Compile PROTO files to codes that reference lightweight runtime
From the document, we could make the protobuf compiler generate codes using the lightweight runtime. You only need to add the following line to your PROTO files.
option optimize_for = LITE_RUNTIME;Using NDK to compile the lightweight runtime codes and link them to the library
How do we know what codes are for lightweight runtime? There’s a clue that you could check out the Makefile, CMakeList.txt or *.cmake files.
From the libprotobuf-lite.cmake file, we knows the source codes for the lightweight runtime.
set(libprotobuf_lite_files
  ${protobuf_source_dir}/src/google/protobuf/arena.cc
  ${protobuf_source_dir}/src/google/protobuf/arenastring.cc
  ${protobuf_source_dir}/src/google/protobuf/extension_set.cc
  ${protobuf_source_dir}/src/google/protobuf/generated_message_util.cc
  ${protobuf_source_dir}/src/google/protobuf/io/coded_stream.cc
  ${protobuf_source_dir}/src/google/protobuf/io/zero_copy_stream.cc
  ${protobuf_source_dir}/src/google/protobuf/io/zero_copy_stream_impl_lite.cc
  ${protobuf_source_dir}/src/google/protobuf/message_lite.cc
  ${protobuf_source_dir}/src/google/protobuf/repeated_field.cc
  ${protobuf_source_dir}/src/google/protobuf/stubs/atomicops_internals_x86_gcc.cc
  ${protobuf_source_dir}/src/google/protobuf/stubs/atomicops_internals_x86_msvc.cc
  ${protobuf_source_dir}/src/google/protobuf/stubs/bytestream.cc
  ${protobuf_source_dir}/src/google/protobuf/stubs/common.cc
  ${protobuf_source_dir}/src/google/protobuf/stubs/int128.cc
  ${protobuf_source_dir}/src/google/protobuf/stubs/once.cc
  ${protobuf_source_dir}/src/google/protobuf/stubs/status.cc
  ${protobuf_source_dir}/src/google/protobuf/stubs/statusor.cc
  ${protobuf_source_dir}/src/google/protobuf/stubs/stringpiece.cc
  ${protobuf_source_dir}/src/google/protobuf/stubs/stringprintf.cc
  ${protobuf_source_dir}/src/google/protobuf/stubs/structurally_valid.cc
  ${protobuf_source_dir}/src/google/protobuf/stubs/strutil.cc
  ${protobuf_source_dir}/src/google/protobuf/stubs/time.cc
  ${protobuf_source_dir}/src/google/protobuf/wire_format_lite.cc
)